Sunday, 9 June 2019
A long gap, problems and Sarah learns to ride
Work finished on the Python some months ago, though there are still many details to add.
Sarah and I tried to ride it and failed. The bike rusted and Sarah found the cranks too long. The handlebar mount broke.
Recently, Sarah tried more successfully to practice, so I stripped the rust with a wire brush on an angle grinder, welded some better handlebars and applied zinc anti-rust primer paint to the frame. Sarah is now at the point of riding confidently as long as steering doesn't need to be precise.
Sunday, 20 January 2019
Preparation for riding practice
With the seat mounted. nearly ready to ride :). I mounted some bars in order to mount a brake lever and installed the rear brake. The BB is mounted to the boom with a Flevobike type adjustable BB shell. The rest of the drivetrain is spares from other bikes.

My partner Sarah was first to sit on the bike.

Now it's just the simple matter of learning to ride. We went to a local space this morning and, as expected, we fell off a lot and didn't go anywhere. There will be many more attempts in the next few weeks, reports to follow.
Once I am happy with the general setup of the bike I will add mounts for lights, rack and mudguards, a front brake, headrest and bottles. I will then paint the bike - again, I will make sure that no more welding needs to be done before I paint. It is possible that the front frame has too much flex - we shall see.
Seat drilling and mount
I drilled the holes in the carbon seat. There is lots of different advice about how to do this on the web. The risk is 'tearout' of the carbon fibre at the bottom of the hole. To avoid this I used a step drill, usually used for drilling sheet metal. This worked well and I got fairly neat holes.

The front seat mount rotates to adjust the seat angle but ther is not bacwards / forwards adjustability. I may add this later if needed. I used weld nuts, which provide a stop for easy location of the seat.

The rear mount will adjust using holes in the mount piece and swivels at the top to allow for angle adjustment. The mount is offset as there is only a frame on one side.


Saturday, 29 December 2018
Rear pivot welding and frame assembly
I cut the rear frame as marked and welded the rear pivot plate. The plate distorted. The front pivot plate had also distorted when welded before. The result was that the rod-end bearings did not align properly and would not turn when tightened. I realigned the front plate by tightening some nuts on a threaded rod passed through the holes. I bent the rear plate in a vise until the alignment was perfect.

I am very pleased with the assembled frame - the front boom is still very long, I will cut this when I am happy with the reach to the pedals. There are many things still to do - seat mount next. I have a carbon fibre seat from Germany.


I am very pleased with the assembled frame - the front boom is still very long, I will cut this when I am happy with the reach to the pedals. There are many things still to do - seat mount next. I have a carbon fibre seat from Germany.


Pivot angle measurement and marking of rear frame cut
I have a platform for painting ceilings. The underside has strengthening steel angles. I used this as a straight edge to clamp the front and rear frames in line and used some threaded rod through the pivot to set the steering angle of 63 degrees (with the invaluable help of Sarah, seen holding the protractor in the picture). I used a magnet to fix the rear frame in the correct place and drew a line at the place where I needed to cut.


You will notice that the rear frame is upside down in the photos. Thankfully I noticed my mistake before cutting and went through the whole process again to make the correct cutting marks.


You will notice that the rear frame is upside down in the photos. Thankfully I noticed my mistake before cutting and went through the whole process again to make the correct cutting marks.
Tuesday, 25 December 2018
Rear frame welding
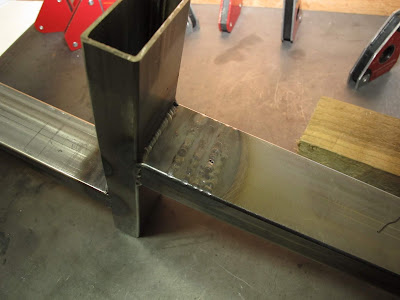
The design of the rear frame has changed from the original plan. I decided to have a crosspiece so that the part of the frame under the seat is now in the centre line of the bike. This adds a bit of weight, but should increase rigidity (twisting) and make mounting the pivot and the seat easier.

When welding, the crosspiece distorted, leaving the two long pieces not parallel. This was expected. My plan was to bend the long section by hand / vise using my body weight. This did not work as the tubing is too strong (on reflection, a good thing). I therefore welded some dummy beads on the outside of the tube to deliberately distort it in the direction needed. I used low power and needed 4 beads before the desired distortion occurred. Pretty pleased that I managed to figure this out.
Tomorrow, I plan to lay out the bike in a parallel frame to finalise the angle and length to cut the rear frame end to mount the pivot plate. I will also use the opportunity to think about a seat position and mounting.

When welding, the crosspiece distorted, leaving the two long pieces not parallel. This was expected. My plan was to bend the long section by hand / vise using my body weight. This did not work as the tubing is too strong (on reflection, a good thing). I therefore welded some dummy beads on the outside of the tube to deliberately distort it in the direction needed. I used low power and needed 4 beads before the desired distortion occurred. Pretty pleased that I managed to figure this out.

Tomorrow, I plan to lay out the bike in a parallel frame to finalise the angle and length to cut the rear frame end to mount the pivot plate. I will also use the opportunity to think about a seat position and mounting.
Subscribe to:
Posts (Atom)